With the Cricut Explore Air 2 software, the DIYer can turn their dreams into reality. Also, with the installed blade, it can cut through all kinds of materials, whether delicate or thick. This versatile cutting machine turns thought into an I Did It.
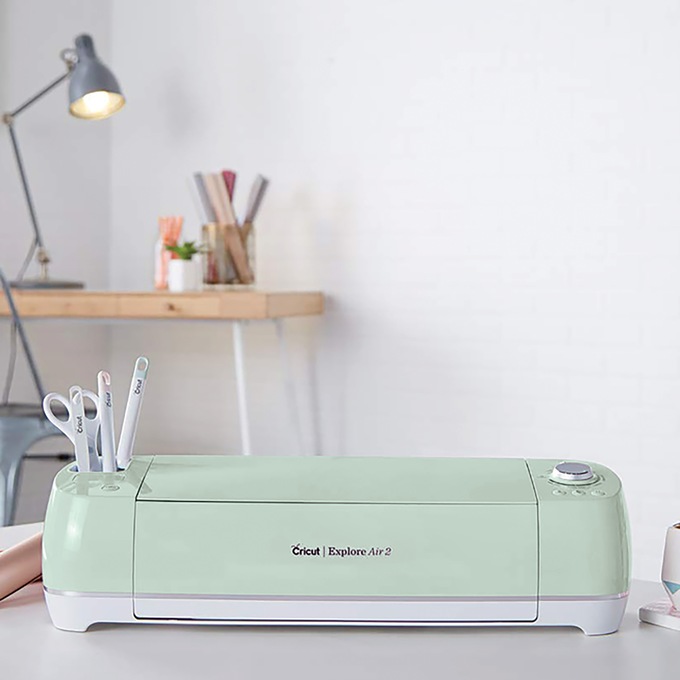
In addition, you get a bunch of free supplies and access to Cricut Design Space to create craft projects. Additionally, it has an in-built tool holder and Bluetooth feature technology to connect it with other devices. If you want to learn more about this Cricut machine, go through the section in the blog below.
What’s Inside the Explore Air 2 Box?
Cricut will provide you with all of the important supplies that are needed while setting up and performing the test cut during the process. We’ve shared the complete names of the supplies that will come along with the Cricut Explore Air 2 software:
- Power cord + USB cord
- Fine-Point Blade + Blade Housing (pre-installed Clamp B)
- Pen and Accessory adapter (already installed in Clamp B)
- Welcome Book
- Quick Start Guide
- 12 x 12 LightGrip cutting mat
- Materials for test cutting
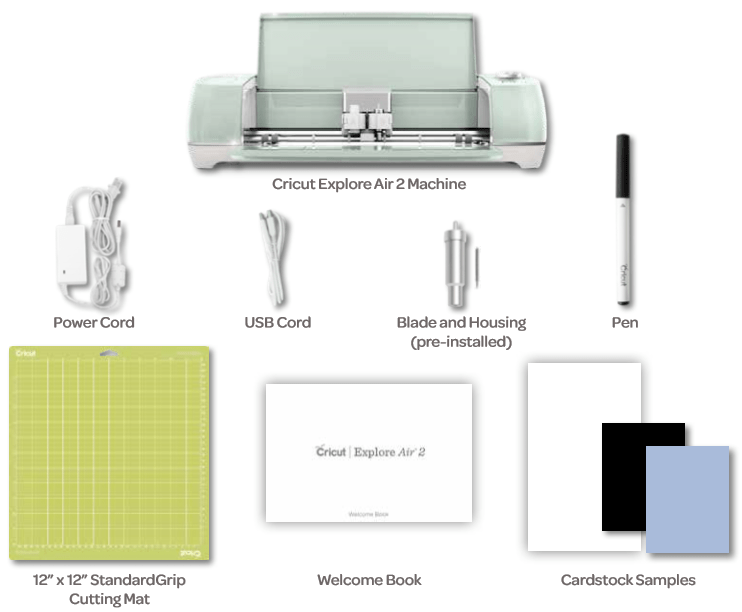
With these supplies, you can effortlessly create your project without facing any technical errors that can damage the project.
How to Pair Cricut Explore Air 2 Software on Windows?
As mentioned in the opening lines of the blog, this Cricut Explore Air 2 can be wirelessly connected to Windows without any interruptions. In addition, you need to read the following instructions for pairing the software with Windows:
- In the starting stage of the process, verify that your Cricut Explore Air 2 is switched on. It should be available within a 10-15 feet range of your system.
- Click on the Start icon, followed by selecting the Settings box.
- On the new page, press the Devices and check whether Bluetooth is enabled or not.
- After that, tap the Add Bluetooth or other devices.

- Next, you need to be calm till the time scanning process comes to an end.
- Enter the PIN (0000) inside the box and tick the Connect option.

How to Pair Cricut Explore Air 2 Software on Mac?
Apart from the Windows, you can also pair up this Cut-die machine with a Mac system by taking the help of the steps available below:
- First, cross-examine that your machine is powered on.
- It must be available within the range of 10 feet-15 feet from the Mac.
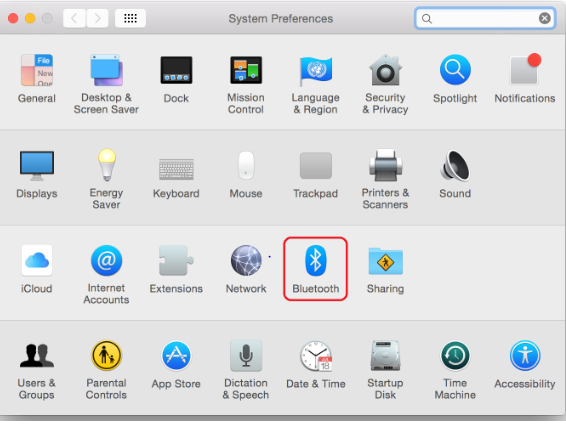
- Next, you need to open the Apple Menu dropbox and tick the System Preferences option.
- At the System Preferences, press the Bluetooth and turn on the Bluetooth (if it isn’t on).
- Once the Mac’s Bluetooth turns on, press the Pair box visible on the right side of the machine name.
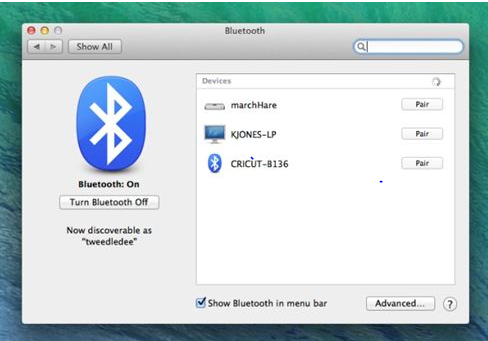
- After that, type a PIN, i.e. 0000 (if prompted), and again select the Pair option.
- Lastly, you’ve to wait till the pairing is in progress.
Following the pairing process of the cutting machine with the Mac system, you can now download & Install Cricut Design Space and start creating new designs.
FAQs
Question: What Are the Materials That Can Be Cut With Explore Air 2 Software?
Answer: After setting up the Smart Set Dial, the machine holds the capability to cut down material such as paper, vinyl, iron-on, light cardstock, fabric and cardstock. However, the customized materials this software can cut are Adhesive Foil, Canvas, Construction paper and many more. However, the user should be responsible for selecting the material type on the dial set.
Question: How to Remove/Re-install Accessory Adapter from Cricut Explore Air 2?
Answer: Follow the steps to remove the adapter from the Cricut Explore Air 2 software:
- Place your thumb under Clamp A and gently apply pressure upwards.
- Then the adapter will automatically come out.
- To re-install the adapter, place the finger under Clamp A to stabilize it.
- Apply some pressure while interesting the adapter, and it will snap into its place.
Question: Why Does My Machine Smart Set Dial isn’t Working?
Answer: If you are facing issues while using the Smart Set Dial, then follow the steps to fix the issue:
- Check that the USB is connected properly to your PC & machine.
- Try connecting the machine to another USB port on the computer.
- If the problem still carries on, then contact Member Care.
Source :- Cricut Explore Air 2
